Wie man sein japanisches Messer schärft: Eine Anleitung für Anfänger
Hier finden Sie eine Schritt-für-Schritt-Anleitung zum Schärfen japanischer Messer mit Doppelschliff mithilfe eines Wetzsteins.
Ein scharfes Messer verändert den Rhythmus beim Kochen. Die Schnitte fühlen sich sauberer an, die Bewegungen leichter, und man kann sich besser auf die jeweilige Arbeit konzentrieren.
Japanische Messer werden nicht nur für ihre Schärfe und Schönheit geschätzt, sondern auch dafür, dass sie durch ihren Gebrauch ganz natürlich zur Pflege einladen. Bei richtiger Pflege behalten sie ihre volle Leistungsfähigkeit. Auch wenn dies anfangs eine Herausforderung sein mag, genügen oft schon wenige grundlegende Schritte, um die Schneide zu Hause sicher und präzise wiederherzustellen.
In diesem Artikel zeigen wir Anfängern, wie man ein japanisches Messer mit beidseitigem Schliff mithilfe eines traditionellen Wetzsteins schärft. Wir erklären Ihnen alles von der Vorbereitung des Wetzsteins bis hin zu den wichtigsten Schärftechniken. Erleben Sie die Befriedigung, ein Werkzeug, das Sie ein Leben lang begleitet hat, mit Ihren eigenen Händen wieder in Bestform zu bringen.
Inhaltsverzeichnis
Warum Schärfe bei japanischen Messern so wichtig ist
Ein scharfes Messer verändert das gesamte Kocherlebnis. Anstatt die Zutaten mühsam durchzudrücken und zu sägen, gleitet die Klinge mühelos und mit minimalem Kraftaufwand. Das schont die Hände, verhindert das Einreißen der Lebensmittel und sorgt für präzisere Schnitte. Eine schärfere Schneide ist zudem sicherer, da das Messer weniger leicht abrutscht.

Ein weiterer Grund, warum Schärfe so wichtig ist, ist die Langlebigkeit. Eine gut gepflegte Schneide sorgt dafür, dass sich Ihr Messer gleichmäßig abnutzt. Japanische Messer sind für eine lange Lebensdauer konzipiert, und regelmäßiges Schärfen ist ein wichtiger Bestandteil dieser Beziehung. Mit jedem Schärfen lernen Sie die Eigenschaften Ihres Messers besser kennen und können dafür sorgen, dass die Klinge so präzise schneidet wie am ersten Tag.
Es geht nicht nur um die Pflege; es verbindet Sie mit der Handwerkskunst, die in die Klinge eingeflossen ist, und mit den Gerichten, die Sie damit zubereiten.
Was Sie zum Schärfen eines japanischen Messers benötigen

Wetzstein
Obwohl es viele verschiedene Arten von Wetzsteinen gibt, verwenden wir in dieser Anleitung einen natürlichen Wetzstein. Westliche Messerschärfer können die Schneide zwar vorübergehend schärfen, aber die Verwendung eines Wetzsteins ist empfehlenswert, da er das Messer so schärft, dass die ursprüngliche Form der Klinge erhalten bleibt. Westliche Durchzieh-Messerschärfer sind generell nicht für japanische Messer geeignet, da sie schnell Material abtragen und die Schneide mit der Zeit abnutzen können.
Schleifsteine werden anhand ihrer Körnung (mit einem #-Zeichen gekennzeichnet), z. B. #220 oder #1000, identifiziert. Diese Zahl gibt die Körnung bzw. die Feinheit des Steins an. Niedrigere Zahlen bedeuten gröbere, höhere Zahlen feinere Körnung. Die Körnung ist üblicherweise auf dem Stein oder seiner Verpackung aufgedruckt. Für Anfänger ein Schleifstein mittlerer Körnung Eine Körnung um die 1000 ist am praktischsten, da sie sich ideal zum regelmäßigen Schärfen und Wiederherstellen einer stumpfen Schneide eignet.

Feuchtes Handtuch oder Tuch
Man legt es unter den Stein, damit er nicht verrutscht. Ein Handtuch hilft außerdem, Wasser und Metallspäne aufzufangen.
Eine Schüssel Wasser
Hilfreich, um dem Stein kleine Mengen Wasser hinzuzufügen, da der Wetzstein beim Schärfen allmählich austrocknet.
Wie man sich vorbereitet
Messer
Entfernen Sie jegliche Rückstände oder Feuchtigkeit von Ihrem Messer. Eine saubere Oberfläche ermöglicht den optimalen Kontakt des Messers mit dem Schleifstein und hält diesen ebenfalls sauber.

Wetzstein
Tauchen Sie den Wetzstein etwa zwanzig Minuten lang in Wasser. Sie werden sehen, wie Luftblasen aufsteigen, während der Stein Wasser aufnimmt. Prüfen Sie, ob sich auf der Oberfläche des Steins ein dünner Wasserfilm gebildet hat.
Ein richtig angefeuchteter Stein verbessert das Gefühl für die Klinge und ermöglicht es den Schleifpartikeln, gleichmäßig in der dünnen Wasserschicht auf der Oberfläche zu wirken.

Schritt-für-Schritt-Schärfanleitung (beidseitig geschliffene Messer)
Diese Schritte konzentrieren sich auf ein einfaches beidseitig geschliffenes Messer, den gängigsten Messertyp für Anfänger. Die Methode ist anwendbar auf Gyuto, Santoku, Und Japanische KleinmesserDie
Schritt 1: Satz Gestalten Sie Ihren Arbeitsbereich
Legen Sie den eingeweichten Wetzstein auf ein feuchtes Handtuch auf eine ebene, sichere Unterlage. Er darf sich beim Schärfen nicht bewegen. Das Arbeiten auf einer instabilen Küchenarbeitsplatte kann zu Verletzungen oder Beschädigungen Ihres Messers führen.
Satz Stellen Sie eine Schüssel mit Wasser in der Nähe bereit, falls Sie Wasser auf den Wetzstein nachfüllen müssen.

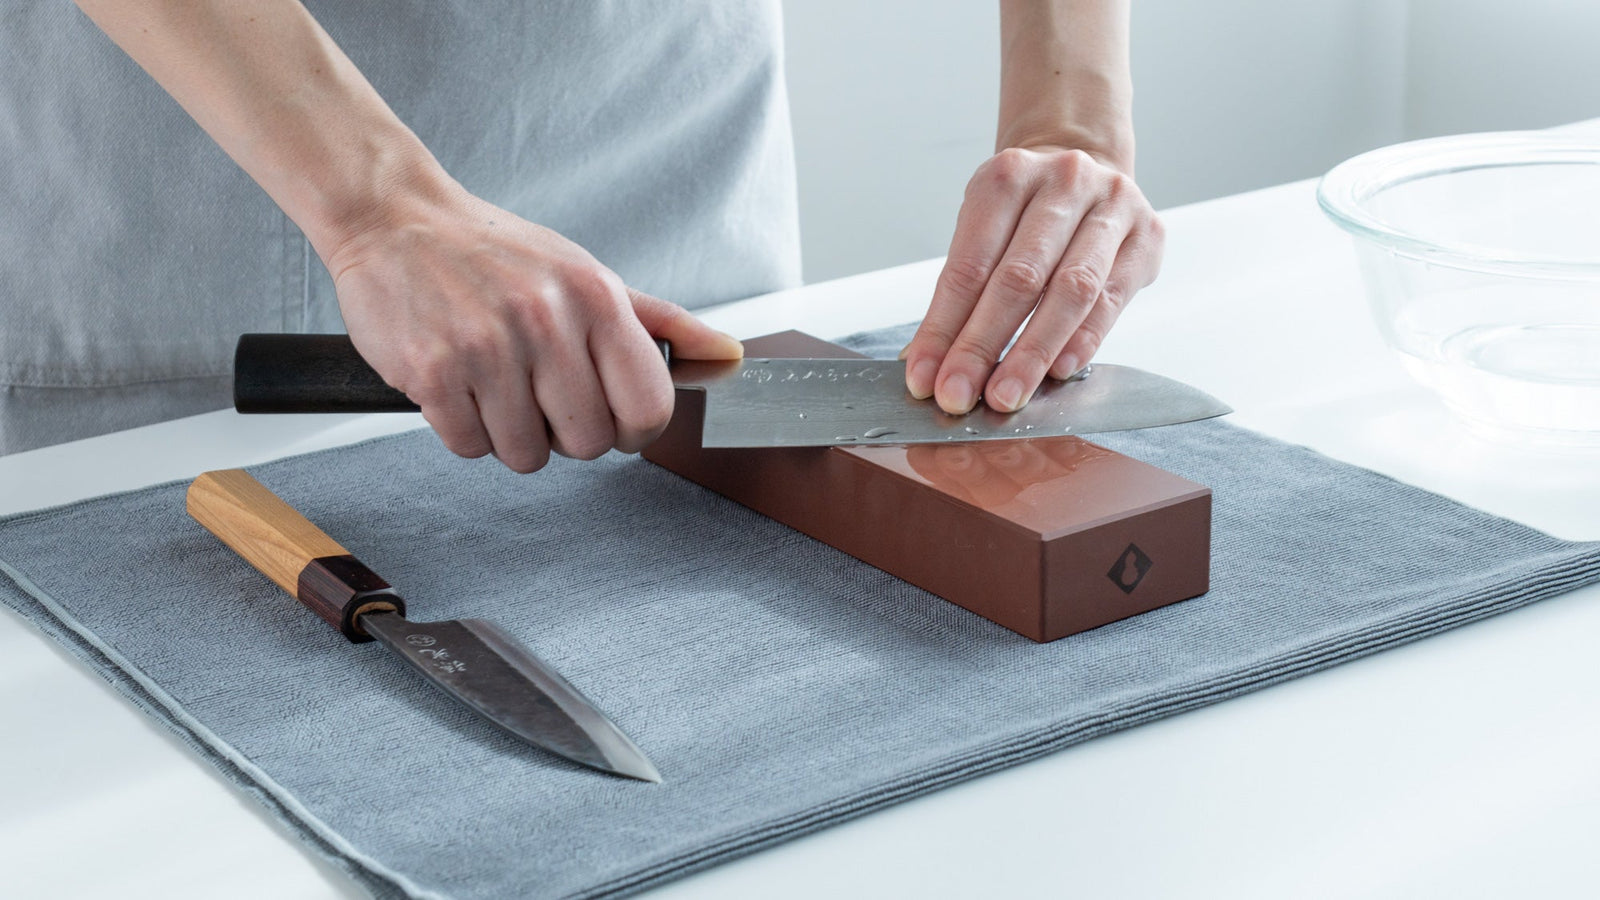
Schritt 2: Schärfen Sie die Vorderseite der Klinge.
Beginnen Sie, indem Sie die von Ihnen abgewandte Seite des Messers schärfen, während Sie es in Ihrer dominanten Hand halten. Positionieren Sie die Klinge so, dass sie in einem Winkel von etwa 25–30° zur Seite des Wetzsteins anliegt. Schärfen Sie in dieser Position. Legen Sie Ihren Daumen auf den Klingenrücken und Ihren Zeigefinger auf den Klingenrücken. Umfassen Sie den Griff mit den restlichen Fingern, damit das Messer nicht wackelt.

Heben Sie als Nächstes den Klingenrücken so an, dass die Schneide etwa 15° zur Oberfläche des Wetzsteins steht. In Japan gilt die Faustregel, dass die Dicke zweier Münzen zwischen Klingenrücken und Wetzstein passt. Diese Einstellung trägt dazu bei, das Messer effektiv zu schärfen und gleichzeitig seine ursprüngliche Form zu erhalten.
Zum Schärfen legen Sie zwei oder drei Finger Ihrer nicht-dominanten Hand auf die Klinge und schieben das Messer vom Körper weg über den Schleifstein. Ziehen Sie es dann leicht zurück. Falls der Stein zu trocken wird, geben Sie etwas Wasser hinzu. Die natürliche Schleifpaste kann helfen, mikroskopisch kleine Unebenheiten zu glätten.

Arbeiten Sie schrittweise von der Spitze zur Ferse. Anfängern hilft es oft, die Klinge in drei Abschnitte zu unterteilen: Ferse, Mitte und Spitze. Wiederholen Sie die Vor- und Rückwärtsbewegung etwa zwanzig Mal pro Abschnitt. So vermeiden Sie, zu schnell vorzugehen, und können besser auf das Gefühl der Klinge an jedem Punkt achten.
Schritt 3: Schärfen, bis sich ein Grat bildet
Beim Schärfen der Klinge faltet sich das Metall zu einem dünnen Grat um, der als Schneidgrat bezeichnet wird (Bari oder hakaeri (auf Japanisch). Sie können dies fühlen, indem Sie mit der Fingerspitze sanft über die Schneide streichen, vom Klingenrücken zur Schneide hin. Wenn Sie eine leichte Rauheit spüren, hat sich der Grat gebildet.
Der Grat ist wichtig, da er bestätigt, dass die Schneide des Messers vollständig geschärft ist. Ohne Gratbildung ist der Schärfvorgang unvollständig.


Schritt 4: Schärfen Sie die Vorderseite der Klinge.
Wechseln Sie als Nächstes zur anderen Seite der Klinge.
Drehen Sie die Klinge so, dass der Klingenrücken zu Ihnen zeigt, und justieren Sie den Griff so, dass die Klinge einen Winkel von etwa 70–80° zum Wetzstein bildet (der Griff ist dabei weiter von der Seitenkante des Steins entfernt). Schärfen Sie diese Seite von der Ferse zur Spitze mit etwa der gleichen Anzahl an Zügen, um die Klinge im Gleichgewicht zu halten. Stellen Sie die Schneide anschließend erneut auf einen Winkel von 15° ein.

Anfänger stellen oft fest, dass sich die zweite Seite etwas anders anfühlt. Das ist normal. Ziel ist es lediglich, so lange zu schärfen, bis der Grat auf die gegenüberliegende Seite übergeht.
Wenn Sie Linkshänder sind, führen Sie die Übung spiegelverkehrt zu den Abbildungen aus. Die Winkel zum Wetzstein bleiben gleich; nur die Hand, mit der Sie das Messer halten, ändert sich.

Schritt 5: Beide Seiten ausgleichen
Nachdem auf beiden Seiten ein Grat entfernt wurde, führen Sie zum Schluss auf jeder Seite einen leichten Zug aus. Heben Sie den Klingenrücken in einem Winkel von etwa 25–30° an (etwa so groß wie vier Münzen zwischen Klinge und Schleifstein). Üben Sie dabei nur minimalen Druck aus und lassen Sie die Vorderseite des Messers in einer einzigen, sanften Bewegung von der Spitze zur Spitze und von unten nach oben über den Stein gleiten. Wiederholen Sie den Vorgang mit der Rückseite des Messers, diesmal jedoch von der Spitze zur Spitze und von oben nach unten. Dieser letzte Zug glättet die Schneide und entfernt verbliebene Unebenheiten.


Schritt 6: Abspülen und abwischen
Spülen Sie das Messer mit Wasser ab und trocknen Sie es gründlich. Achten Sie darauf, dass keine Feuchtigkeit auf der Klinge zurückbleibt, insbesondere bei Messern aus Kohlenstoffstahl oder mit einem Kern aus Kohlenstoffstahl.
Spülen Sie auch Ihren Stein ab. Wischen Sie Rückstände ab und lassen Sie den Stein vor der Lagerung vollständig trocknen.
Ihr Messer sollte sich nun spürbar schärfer anfühlen. Es sollte Zutaten mühelos durchschneiden. Mit der Zeit und zunehmender Übung wird die Schneide noch feiner.

Das Schärfen Ihres Messers wird mit der Zeit immer intuitiver. Jede Anwendung lehrt Sie etwas Neues, sei es das Geräusch der Klinge auf dem Schleifstein oder das Gefühl des Drucks unter Ihren Fingerspitzen.
Bei regelmäßiger Pflege bleibt Ihr Messer zuverlässig und einsatzbereit, unterstützt Sie Tag für Tag beim Kochen und lässt Sie jeden sauberen Schnitt und jede Scheibe aufs Neue wertschätzen.
Wir hoffen, dass Ihnen dieser Ratgeber hilft, Ihr japanisches Messer lange in Ihrer Küche zu nutzen. Wenn Sie Ihr Wissen über japanische Messer über das Schärfen hinaus vertiefen möchten, können Sie in unserem Blog die verschiedenen Messertypen und deren tägliche Pflege entdecken. Leitfaden für japanische Messer.
Stay close to the craft
Now and then, a quiet letter — new stories, seasonal notes, and the hands behind the work.
Küchenschränke neu organisieren: Tipps zur Küchenaufbewahrung
Lernen Sie Aufbewahrungstipps nach Material, Stapelregeln und saisonale Wechselmöglichkeiten für einen einfachen Zugriff.
Donabe-Abend aufwerten: Geschirr und Küchenutensilien für ein besseres Hot-Pot-Essen
Schaffen Sie ein authentisches japanisches Hot-Pot-Setup mit Donabe-Utensilien und Tischbesteck, das für einen reibungslosen…
Fukube Kaji: Ein Schmied, bei dem Werkzeuge die Tradition bewahren
Entdecken Sie Fukube Kaji, einen 118 Jahre alten Schmied aus Ishikawa, der langlebige Messer…
Leave a comment