Guide to Maki-e Part 2: Production Process
Learn how maki-e art comes to life with gold, lacquer, and pearl. This guide reveals each stage of the traditional craft.
This is Part Two of our Guide to Maki-e, courtesy of Urushi Art Hariya. This part provides a step-by-step walk-through of how a maki-e piece is crafted from start to finish, with real examples. For Part One, please click here.
*This article and all images are provided by Hariya Masayuki of Urushi Art Hariya. English translation by Team Musubi.

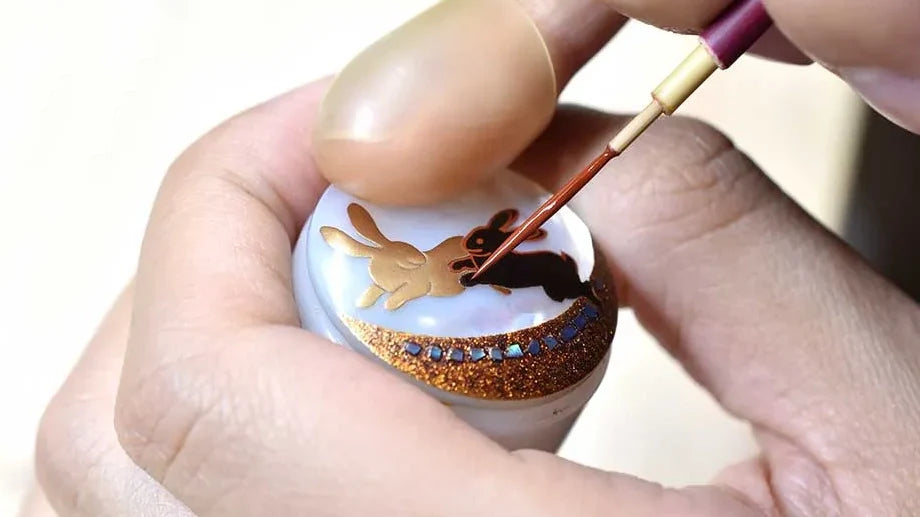
Maki-e is a technique in which a design is painted with lacquer, sprinkled with maki-e powder, and then polished. So, how is a dazzling work of maki-e created? Here, the process of painting two rabbits and the moon on a pearl oyster shell using hira maki-e (flat maki-e) is introduced.
Design
First, the craftsperson considers what kind of maki-e design to create. At this stage, they also must decide which size gold powder to use for which parts of the piece and which color lacquer to use. Because corrections are difficult later, this planning stage can be the most time-consuming.
A design was drawn of two rabbits leaping under the moon. Notes are included on the types of gold powder, lacquer, and techniques to be used.

Okime: Design Transfer
Okime is the process of transferring a design onto a base material. First, a stencil is created by flipping over the paper on which the initial design is drawn and tracing the lines with lacquer on the back side of the paper. This is called okime-egaki. Next, the stencil is placed on the base material, and lacquer is transferred with a brush in a process called okime-tori. Together, these steps are referred to as okime.
1. The maki-e brush is washed, and bengara lacquer is applied to the tip.

2. Okime-egaki: The lines of the design are traced on the back side of the paper.

3. Okime-tori: The lacquered side of the stencil is placed face down on the base material. The stencil is held in place with the fingers, then pressed down with a brush to transfer the design.

4. The okime is complete. When transferring a design to black lacquerware, the red bengara lacquer is difficult to see, so keshifun (powdered gold leaf) is sprinkled on top to make the transferred area visible in gold.

Urushiburo: Curing Cabinet
The piece is placed in an urushiburo, a curing cabinet, to let the lacquer harden.
Lacquer hardens when the laccase enzyme it contains absorbs moisture from the air and reacts, causing the main component, urushiol, to solidify. Leaving lacquer to harden as-is takes time, so instead it is placed in a curing cabinet where conditions conducive to hardening are maintained (temperature: 20–25°C / 68–77°F, humidity: 70–85%). The time it takes for lacquer to harden varies by season, but it typically takes at least one day. This cabinet also blocks airflow and prevents dust and particles from adhering to the surface.
1. This is the largest urushiburo cabinet at Urushi Art Hariya.

2. The lacquerware piece is placed on a board and put inside. Buckets of water sit under the shelves.
*The temperature and humidity readings in the image are lower than normal because the door was open to take photographs.

Colored Lacquer Process
Shitazuke: Undercoat
Using the okime’s transfer marks as a reference, lacquer is applied as a shitazuke—undercoat or base coat—to the areas where gold powder will be sprinkled. Lacquer is used to draw the outlines of the design, a process called jimaki, or sprinkled ground. Then the area within the outlines is filled in with lacquer, a process called jinuri, or ground lacquering. This lacquer acts as an adhesive to affix the gold powder to the base material.
1. Black lacquer is poured onto filter paper, which is then folded up to strain the lacquer.

2. (Jimaki) Black lacquer is applied to a maki-e brush and used to paint the outlines.

3. (Jinuri) The outlined area is filled in with lacquer.

4. The undercoat is complete. If there is not enough lacquer, the coating will be too thin for the gold powder to stick well, so more lacquer is added as needed.

Funmaki: Sprinkling Metal Powders
Next, the lacquered areas are sprinkled with gold powder in a process called funmaki, literally “powder sprinkling.” Gold powder is placed in a funzutsu, or powder tube (a bamboo or reed tube with a piece of fabric covering one end), which is tapped with a finger to evenly sprinkle the powder. Any excess gold powder is removed with a brush. This process is repeated until the lacquer undercoat no longer shows through. The piece is then placed in the curing cabinet for at least one day to harden.
1. Gold powder is put into the powder tube using a kebo brush. The powder tube is held between the thumb and index finger, and powder is sprinkled by flicking the tube with the middle finger.
Here, the angle of the pearl oyster shell is changed while sprinkling the gold powder in order to distribute the powder evenly.

2. Any excess gold powder outside the lacquered area is removed with the kebo brush.

3. The powder sprinkling is complete. The piece is once again placed in the curing cabinet to let the base coat of lacquer harden.

Fungatame: Powder Hardening
Since just powder sprinkling alone would leave the gold powder prone to peeling, another coat of lacquer in the same color used for the undercoat is applied in a process called fungatame, or “powder hardening.” This makes the gold powder adhere firmly.
1. Colored lacquer is applied to the gold-powdered areas using a maki-e brush.

2. The fungatame is complete. The piece is placed in an urushiburo cabinet to harden the lacquer.

Togi: Sanding
Once hardened, the areas coated with lacquer for powder hardening are sanded down. Sanding evens out the height of the maki-e. This step is important because if fresh maki-e is drawn next to an unsanded surface, the new lacquer will easily flow toward the rough area. Sandpaper or charcoal is used for sanding.
1. The sandpaper is moistened and used to sand the powder-hardened area.
Sanding too much, to the point that the underlying base material becomes visible, is called togi-yaburi. Care must be taken not to over-sand.

2. The sanding is complete. The maki-e surface that felt rough before now feels slightly smooth.

3. When viewed from a different angle, you can see gold powder shining within the black lacquer.

Gold Lacquer Process
Shitazuke: Undercoat
The second rabbit is finished in gold. For clarity, these steps are labeled “gold maki-e.” As with the undercoat of colored lacquer, lacquer is applied to the areas where gold powder will be sprinkled, using the okime tracing as a guide. The difference here is that bengara lacquer is used instead of the black-colored lacquer.
1. (Jimaki) Bengara lacquer is applied to a maki-e brush and used to outline the design.

2. (Jinuri) The outlined area with lacquer is filled in.

3. The undercoat is complete. If too little lacquer is applied, the coating will be thin and the gold powder will not adhere well, so additional lacquer is added as needed.

Funmaki: Sprinkling Metal Powders
Gold powder is sprinkled in the same way as in the earlier steps with colored lacquer.
1. A powder tube is used to sprinkle gold powder, just as in the colored lacquer step. After sprinkling, the surface is checked. If the gold powder has sunk and the red lacquer beneath is visible, more powder is applied.

2. The powder sprinkling is complete. The piece is once again placed in the curing cabinet to let the base coat of lacquer harden.

Fungatame: Powder Hardening
The powder for the gold maki-e is hardened using ki-urushi, or raw lacquer. Raw lacquer is applied to cotton and rubbed onto the powdered areas. Any excess raw lacquer is then wiped off.
1. Raw lacquer is applied to cotton and rubbed onto the powdered area.

2. This shows the piece after the raw lacquer has been rubbed on. It does not matter if the lacquer spreads beyond the powdered areas.

3. Excess raw lacquer is wiped off from the powdered area, as well as from any other areas where it has adhered.

4. The powder hardening is complete. The piece is placed in an urushiburo cabinet to harden the raw lacquer.

Togi: Sanding
For sanding the gold maki-e, sandpaper is used in the same way as in the colored lacquer steps.
1. The sandpaper is moistened and used to sand the areas where the powder has hardened.

2. The sanding of the gold maki-e is complete. The gold color can be seen shining a little more brightly.

E-nashiji Process
Next, we will sprinkle nashiji powder (a type of gold powder) on the moon below the rabbits. E-nashiji refers to designs made with nashiji powder.
1. (Jimaki) Bengara lacquer is applied to a maki-e brush and used to paint the edges of the design.

2. (Jinuri) The area outlined with lacquer is then filled in.

Raden Zaiku: Mother-of-Pearl Inlay
Thin pieces shaped from shell layers are placed on top of the lacquer. This method of attachment in raden craftsmanship is called okigai-ho, or “shell-placing technique.”
1. A bamboo skewer is used to place the shell pieces onto the bengara lacquer.

Funmaki: Powder Sprinkling
Nashiji powder is then applied in the same way as in the colored lacquer maki-e steps.
1. Nashiji powder is sprinkled onto the undercoat of bengara lacquer.

2. The powder sprinkling is now complete. The nashiji powder has a strong golden color, so it sparkles beautifully. The work is then placed in a curing cabinet to harden the lacquer undercoat.

Fungatame: Powder Hardening
The e-nashiji is hardened using a vermilion-colored lacquer called shuai lacquer.
1. The shuai lacquer is applied to the powdered area using a maki-e brush.

2. The powder hardening is complete. The work is placed in a curing cabinet to harden the shuai lacquer.

Togi: Sanding
Sandpaper is then used in the same way as with the colored lacquer. Since the main maki-e design has been completed, the entire surface is sanded at this stage.
1. The shuai lacquer on top of the e-nashiji has dried and darkened in color. The shells of the mother-of-pearl inlay are also concealed by the shuai lacquer and nashiji powder, giving them a muted appearance.

2. The entire surface of the maki-e work is sanded with sandpaper.

3. The sanding is complete. The gold rabbit shines like a thin sheet of gold, and the gold powder within the black rabbit has become more visible. The mother-of-pearl inlay has also come forward, bringing the piece closer to completion. The next step is polishing to enhance its luster.

Migaki: Polishing
Once the painting is complete, the polishing process begins. The surface is first polished with a coarse compound (polishing powder) to remove marks, then gradually with finer compounds to increase the luster. For three-dimensional works such as taka maki-e, dozuri is performed. In this process, oil and roiro powder are applied to the palms and fingers, which are then used to polish the piece.
1. The polishing is complete. The gold and black rabbits have become smoother, with an even greater luster!

Keuchi Process
Fine Line Detailing
After polishing, fine lines are added on top of the maki-e using a detailing technique called keuchi. Used in hira maki-e, this method is an effective way to highlight paintings and patterns.
1. Fine lines are drawn with bengara lacquer.

2. This shows how the piece looks once the lines are drawn.

3. Gold powder for the keuchi is applied with silk wadding and sprinkled. The silk wadding is then used again to brush away any excess powder.

4. The keuchi process is complete. The piece is placed in a curing cabinet to harden the bengara lacquer.

Fungatame: Powder Hardening
Raw lacquer is used to solidify the gold powder used for the keuchi.
1. Raw lacquer is applied to cotton and rubbed onto the area on which powder was sprinkled.

2. Any excess raw lacquer is wiped off from the powder-sprinkled area, along with any raw lacquer that has adhered to other surfaces.

3. The powder hardening is complete. The piece is placed in the curing cabinet to harden the raw lacquer.

Completing the Hira Maki-e (Polishing)
After the raw lacquer used to set the powder on the keuchi has hardened, the final polishing is carried out. To bring out the luster, the surface is polished step by step, using progressively finer compounds. Once the powdery texture of the keuchi disappears, the hira maki-e is complete.
This piece took about two weeks to create, though the production time may vary slightly depending on the season, as the hardening of lacquer changes with temperature and humidity.

Artist’s Signature
After the hira maki-e is complete, metal fittings are attached. (The fittings also require one day to harden.) To show who created the piece, the artist’s signature or seal is added to the back. When the writing surface is small, initials are used instead.
The signature is written in bengara lacquer, and the piece is placed in the curing cabinet to harden.

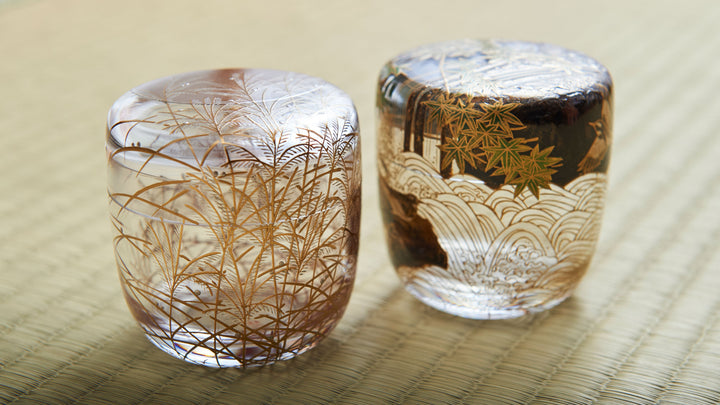
After E-nashiji
Immediately after completion, the e-nashiji appears dark due to the brown tone of the shuai lacquer used for powder hardening, but over time, this brown gradually fades. This process is referred to as “lacquer settling.”
Shown here is the two rabbits maki-e brooch on white pearl oyster shell, more than a year after its creation, with the gold of the e-nashiji now standing out strongly.

view HARIYA MASAYUKI collection
The above images are for illustrative purposes only. Courtesy of Urushi Art Hariya.
Stay close to the craft
Now and then, a quiet letter — new stories, seasonal notes, and the hands behind the work.
Guide to Maki-e Part 1: Types, Materials & Techniques
Explore the art of maki-e, Japan’s lacquerware technique using gold and silver powders.
Urushi Art Hariya
Maki-e in Transparency: The Innovative Art of Hariya Masayuki
Maki-e artist Hariya Masayuki fuses tradition and acrylic, creating natsume tea containers of shimmering…
Guide to Japanese Pottery
Learn about the history of Japanese pottery, porcelain, stoneware, earthenware, and care tips for…
Leave a comment