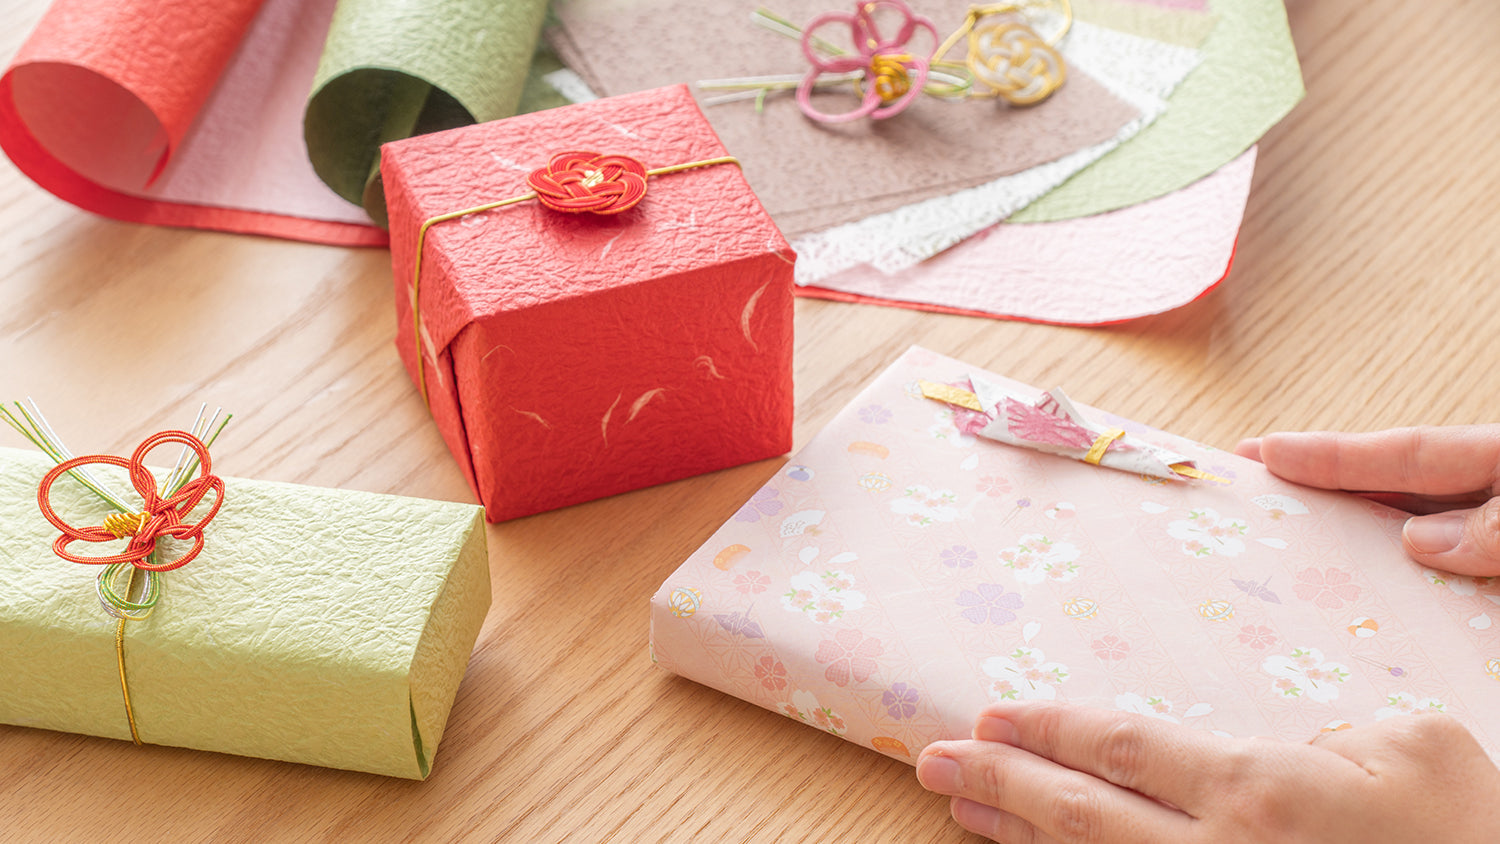
How to Wrap a Present Like a Japanese Gifting Pro
Written by Rebecca Menasché
My first job at a Japanese company was in the U.S. with a television studio, so colleagues frequently went on business trips to Japan for work. When they came back, they’d bring with them beautifully-boxed and wrapped omiyage, or local souvenirs, from the places they’d been. I personally coveted the light sweetness of Tokyo Banana, as well as the high-end butter cookies of which our head of finance was particularly fond.
Unwrapping these was a delightful—and multi-step—process. Sometimes there was a bow to untie, first. Then a decorative slip of wrapping paper over the main wrapping paper. Then the main wrapping paper, pristinely folded. Under that, a box, which could be quite robust, sometimes even made of plywood instead of cardboard. Only then would you open the lid to reveal neat rows of pretty little sweets or rice crackers, each individually wrapped, themselves.
What I appreciated so much wasn’t just the snacks, though they were delicious. It was the experience itself of receiving such a beautiful package, the fun of unwrapping it, and the charm of seeing the treats nestled prettily in the box.
Attention to detail like this is precisely what’s so special about Japanese gift-wrapping. Japan as a culture understands that the whole package creates a feeling, and that feeling, not just the item, is what you gift.
So follow along with Team Musubi as we show you how to tie this into your own gift wrapping, whether for the holiday season, a birthday, as part of a thank you present, or simply as a little treat for someone special.
table of contents
Wrapping How-To
To learn how to wrap a gift I enlist the help of my colleague Kobayashi-san. During college she worked part-time at a pastry shop where she wrapped gift boxes for customers’ orders. So this is how the real pros do it!
Try the step-by-step instructions below for a wrapping method called naname-tsutsumi, “diagonal wrapping.” Many Japanese department stores, confectionery shops, and other sellers of gifts and omiyage use naname-tsutsumi to quickly create a polished finish. The final outcome will be sure to impress.
Preparation
1. Gather your materials.
You’ll need:
- Wrapping paper
- A gift box
- Scissors or a box cutter
- Tape
Optional:
- A mizuhiki
- A noshi or 3 sheets of origami paper

Try MUSUBI KILN’s convenient rubber band mizuhiki and artisan-crafted washi origami paper for noshi here:
2. Cut your wrapping paper to the correct size.

Kobayashi-san explains how to figure out the amount of paper you need and where to place the box. “For this wrapping method, you’ll start by placing the box on a diagonal, with three corners placed within the borders of the paper and one corner outside. You need enough paper so that if you fold it over toward you, the entire box will be covered.”


I don’t get it at first, but as she demonstrates, I understand. The left and right diagonal corners of the box, as seen in the images above, need to be a few inches away from the edges of the paper. If any of the corners are too close, when you fold the paper over it won’t cover the whole box. And if you have a bare corner of the box at this stage, you’ll end up with an exposed corner after wrapping, too.
How to Wrap
1. Check the placement of the box to let happiness in or sadness out!
The final wrapping will create a pocket at one end of the box—and that pocket has symbolic meaning.
“For celebratory occasions,” Kobayashi-san tells me, “you want the pocket facing up, to catch happiness and luck. But for sad occasions, that pocket should be facing down, so that bad things don’t build up.”

So when wrapping for holidays, birthdays, promotions, retirements, and anniversaries, place both of what you want to be the box’s top corners within the boundaries of the paper, as shown in the image. (Think of a “This Way Up” arrow: what side of the box is “up” when viewing the gift inside? For example, if it’s a book, the title should be legible, not upside down; if it’s a sweater, the collar should be at the top; and so on.) But when wrapping items like condolence gifts, turn the box 180 degrees so that the bottom corners of the box lie within the paper, instead.

2. Make the first fold.
a. Fold the corner of the paper closest to the box over the upper side of the box.


3. Make the second fold.
The full sequence:
Step-by-step:
a. With one finger, push the paper inward against the side of the box near the corner. Here’s a detailed image:

b. Pull the side flap of paper up vertically.
c. Fold that flap over the top of the box.

d. Secure it in place with a piece of tape.

4. Make the third fold.
The full sequence:
Step-by-step:
a. You’re going to fold the paper inward similarly to the way you just did in Step 3a, but on a larger scale. Use a finger to fold the very corner of the paper against the side of the box. This loosely creates an upper flap, going vertically, and a lower flap, going sideways.

b. Fold the box over, away from you. As you do, line up the lower flap (created in the previous step) so that as you fold the box down it creates a crease in the paper that sits in a straight line with the side of the box. The upper flap doesn’t have to line up; just make sure it’s tucked inward, not sticking out the side.

c. Fold the box over again so it lays upside-down and flat against the table. As you do, make sure the crease of the lower flap stays aligned with the edge of the box.

If you need to adjust it, you can roll the crease a bit between your thumb and forefinger. When you’re done, this will become the pocket that either lets sadness flow out, or catches happiness and luck!

5. Make the fourth fold.
The full sequence:
Step-by-step:
a. Just like you did in Step 3a, use your finger to push the paper inward against the side of the box near the corner.

b. Pull the paper up and over. Line it up with the edge of the box.


c. To create a more professional presentation, fold the outside edge of the paper inward. This crease will remain visible when the gift wrapping is complete, so folding the edge inward hides any unevenness from your scissors or box cutter.


d. Tape it down.

6. Make the fifth (and final!) fold.
The full sequence:
Step-by-step:
a. Just like you did in Steps 3a and 5a, pinch the side of the paper against the box near the corner.

b. Pull the paper up vertically, once again so it aligns with the edge of the box.

c. Fold the flap over the box.

d. Fold just the outside edge of the paper inward like you did in Step 5c. This time, you’ll do it on both of the exposed edges of the paper.


e. Add a piece of tape, and you’re done! The side where the creases are exposed is the back of the box.

The pocket we made is on the front top of the box, as shown on the left. If you’re wrapping for a sad occasion, it will be on the bottom. Remember which way is up for when you add mizuhiki, noshi, or “to” and “from” labels.

Wow, so professional! Thanks, Kobayashi-san! We couldn’t have done it without you. This is truly a polished gift-wrapping, just like you might get in a high-end Japanese cake shop or department store.
Add a Mizuhiki

Secure a mizuhiki rubber band over the wrapped box to add ornamentation and further complete the look.
Mizuhiki are decorative ornaments that often accompany gift wrappings. When not used for gifts, they also make colorful ties for lunch boxes, napkin holders, and wine. Try our Tsuda Mizuhiki Knots in auspicious plum or pine needle designs.
Add a Noshi

First of all, what are noshi?
Noshi originate from dried and stretched abalone meat called noshi-awabi, which became popular during the Edo period (1603–1868 CE) as an accompaniment to celebratory gifts. Buddhist practice at the time prohibited offerings with a fishy smell for funeral rituals. So the fishy noshi-awabi came to be attached to celebratory items to emphasize that the gifts weren’t for unfortunate occasions. Eventually noshi came to be wrapped in celebratory red and white paper, and these days, the abalone is often foregone, a strip of yellow paper used in its place.
If you already have noshi decorations at home, that’s great! Go ahead and attach one to the present. But if, like most people, you do not, noshi are easy to make yourself with origami paper. Try it out with our offerings from maker Morisa, here or here. (We use different paper for the step-by-step below because it was easier to photograph in a larger size.)
How to Create a Noshi: Step-by-Step Instructions
1. Pick two sheets of origami paper for the main part of the noshi, plus a third piece of paper you don’t mind cutting strips from.
For noshi, red usually goes on the inside and white on the outside, with a yellow strip of paper inserted in the middle and another strip wrapped around the middle. But you can play around with color and pattern, also.

2. Place the two sheets of origami paper together and position them diagonally so that one corner points down. If you’re using traditional red and white, red should be on the top and white on the bottom.


3. Take both pieces of paper at once and fold the right side over, leaving a bit of space all around the left side of the paper.


5. Fold this same flap of paper over to the left, creating a vertical line running down the center. The corner of the paper should cross over the left edge of the previous fold.
That completes the main part of the noshi. Note the asymmetry at top and bottom.

6. Cut or fold another sheet of paper to get two strips: one long one that will be inserted into the noshi paper, and one short one that will bind the whole thing together. It feels a bit wrong to cut origami paper, but that’s what I have on hand so that’s what I use.

7. Insert the long strip of paper into the center of the origami noshi paper. This strip represents the abalone. It should peek out both top and bottom.

8. Place the short strip of paper about a third from the bottom of the noshi and fold it around the back to bind everything together. Put a piece of tape in the back to hold it together, or tape the completed noshi to your gift as is.

The noshi is complete!

9. Tape the completed noshi to the upper right quadrant of your wrapped gift. (We made another, smaller one to match the size of the gift.)

All done!
Now your gift is wrapped and ready to give. The neat, professional-looking Japanese gift-wrapping should make a good impression no matter who your gift is for, whether family, friends, or business partners. Now that you can wrap and decorate in a Japanese aesthetic with confidence, we hope you will enjoy this year’s celebrations even more!
Gift Ideas

Ready to wrap but not sure what to gift? Check out our handy gift guide below to view items by category, including recipient, price range, and occasion:

If you’d like a bit of inspiration, check out our series of gift-focused articles to find gift suggestions matching any season or reason.
Wrapped your present but still want to learn more? Read our blog here on wrapping and knotting culture in Japan. Or visit our blog post here to learn how to use beautiful and reusable furoshiki wrapping cloth to sustainably wrap a lunch box, shopping bag, and more.
Completed with Hospitality and Care
Now you don’t have to go to a department store in Japan and buy omiyage souvenirs to witness the impressive art of Japanese gift-wrapping—you can do it yourself at home. Gift-giving plays an important social role in any culture, and the wrapping a gift comes in isn’t superficial. It’s a way to show that you value the other person. We hope the tips in this blog help you show your appreciation and care with style.


4 comments
@Susan We are so glad to know that you enjoyed the journal. Wrapping could be challenging at first, but if you try to practice slowly, it will become enjoyable! We hope your loved ones and you will have a Merry Christmas, Mele Kalikimaka!
Team
Mahalo for your clear instructions with step-by-step photo sequences. As I practice and perfect the process, I believe my family and friends will appreciate the minimalist beauty of wrapping in this style!
Mele Kalikimaka from Hawaiʻi
Susan
@maria farmer
Hi Maria, thanks so much for your comment! We haven’t published any books – at least, not yet! – but we appreciate the kind suggestion.
Team Musubi
Fantastic do you do books on this.
maria farmer
Leave a comment
This site is protected by hCaptcha and the hCaptcha Privacy Policy and Terms of Service apply.