A Step-by-Step Guide For Ikebana Beginners - Part 2
Written by Team MUSUBI
Experiencing ikebana firsthand is a rare and special opportunity, even for those living in Japan. In the first part of our ikebana blog, we shared how Team Musubi took its first steps into the world of this floral artsitry. Guided by Matsuki sensei, a skilled instructor from the Ohara School of Ikebana, we learned the fundamental concepts, essential materials, and basic techniques that form the heart of this traditional practice.
Now, in the second and third parts of our blog, we’re inviting you to join us as we put our new skills to the test. Our ikebana challenge was filled with smiles, moments of quiet focus, and a lot of head-tilting as we let our creativity take root and bloom.
Come see how our arrangements turned out—and pick up some practical techniques and tips along the way to help you create beautiful ikebana of your own.

tables of contents
Ikebana Arrangement With a Kenzan
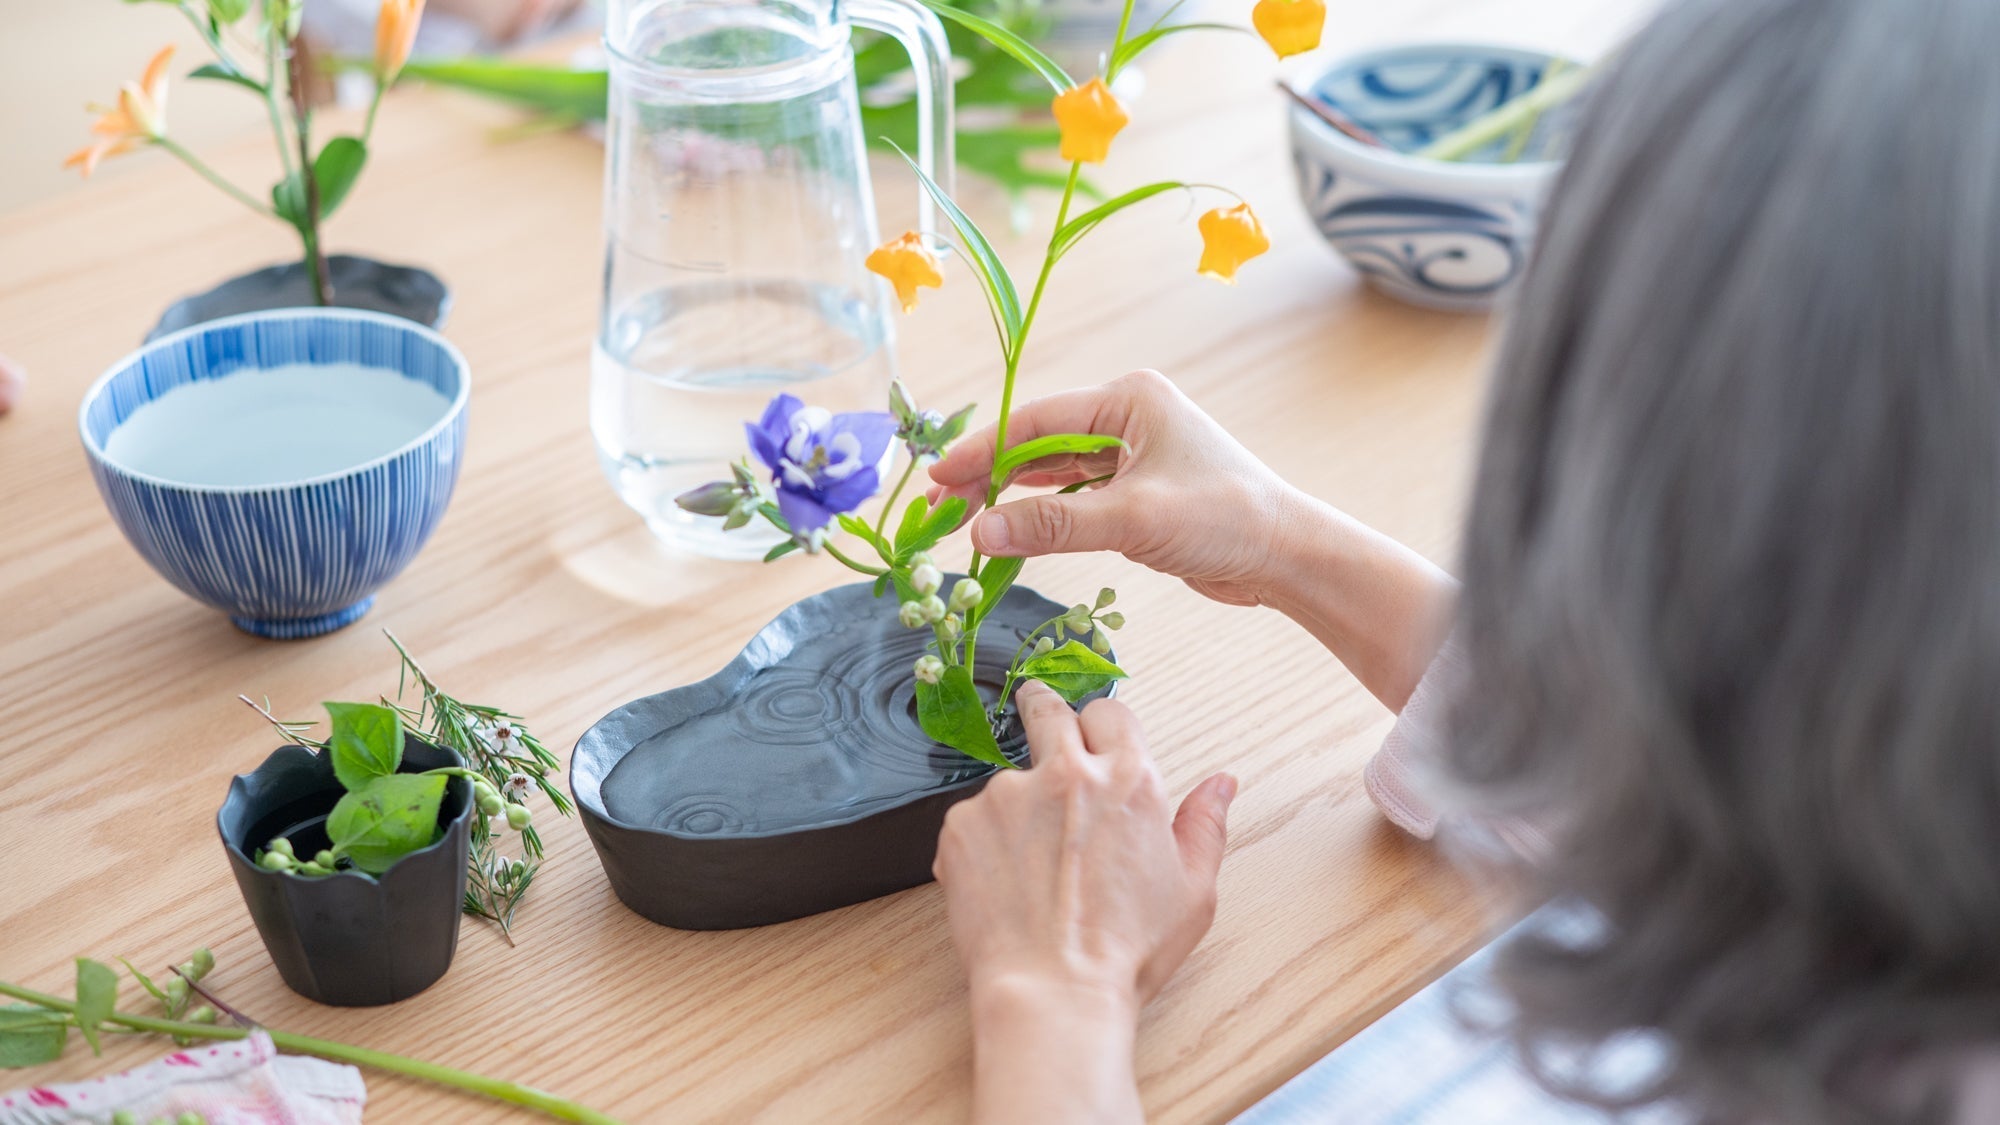
Before we began, Matsuki sensei reminded us that ikebana is about working with nature’s curves, not against them. The key to understanding a flower or branch’s natural shape is to find its center of balance. One simple way to do this is by resting it on the tip of your finger and observing how it tilts and bends.
Now, we were ready to choose our vases.
Mika-san and I selected the Reverse Mt. Fuji Ikebana Flower Vase, which comes with a small kenzan (flower frog).
We were first instructed to place the main material into the kenzan. Surprisingly, this didn’t have to be a flower—it could be a branch or even an interestingly shaped leaf.
To insert a flower or branch, hold the end of the stem and gently placed it onto the needles of the kenzan, adjusting the angle to achieve the desired look. We initially thought using a kenzan would be tricky, but to our surprise, it made securing the position of each element much easier than arranging flowers in a vase.

Mika-san chose a bright yellow sunflower—a perfect match for her radiant and kind personality. To complement it, she added leaves from a Solomon’s Seal plant.
“Deciding the right height for the stems and how much foliage to keep was a challenge,” she said, “but the experience of purely focusing on just the flowers was quite fun!”

For the finishing touch, she added delicate white flowers from a mock orange shrub. With the sunflower and foliage providing height, she placed the mock orange flowers near the base, creating a balanced triangular composition.

The bright yellow of the sunflower contrasts beautifully with the vermillion metallic surface of the Gingado vase. Look closely, and you’ll catch a glimpse of Mount Fuji reflected in the water beside Mika-san’s stunning arrangement.

I went for a more muted color palette. Matsuki sensei suggested adding bulrush stems, saying they’re an interesting choice to work with in a kenzan.
I took a good look at the curves of the purple columbine flower I chose, figuring out the best way to set it upright. Then, I tucked in a waxflower near the base to soften the overall look.


Lastly, I added the tall bulrush stems. The delicate petals were a perfect match with the straight rigid lines of the bulrush. The pine-like needles of the waxflowers framed the stunning reflection of Mount Fuji in the water, adding a subtle detail.

After showing my arrangement to Matsuki sensei, she suggested adding more bulrush stems to give the composition a fuller look. Just by placing two more stems, the arrangement gained a greater sense of movement and refinement—see how it transformefd with this simple adjustment.

Ikebana Arrangement in a Small Single Flower Vase
Saori-san chose a striking, rectangular vase with an asymmetrical opening, making it an intriguing choice for her arrangement.
With its smaller opening, she found it fairly easy to set the flowers in place. To create balance, she focused on adding volume to the left side, as the opening was positioned on the right. This approach helped achieve a natural yet harmonious composition.
Saori-san's choice of a single hyacinth orchid and a dainty small waxflower nicely showcased the dynamic designs of gold on light teal.

With a small opening, setting flowers is easier than in a larger vase, but finding the perfect angle still takes a bit of technique. Matsuki sensei adjusted the position of the hyacinth orchid slightly to the left—a small change that made a noticeable difference. In fact, these subtle adjustments played a key role in refining all of our arrangements.
Matsuki sensei explained that developing "a feel" for the right composition comes with experience.
Saori-san remarked, “Now I see why understanding a flower’s center point is so important. When arranging without a kenzan, you have to anticipate how the flower will bend and which direction it will face.”

Balance is always an important factor to consider. The subtle tones and minimal use of flowers felt just right for the vase.

Yoshiko-san selected a Kutani vase featuring a majestic red Fuji. For her main element, she chose a branch from a dragon claw willow. The bell-shaped yellow blooms of the Sandersonia hung beautifully beneath the willow’s curved twigs, creating a delicate interplay of shape and movement.

As Matsuki sensei observed her arrangement, she suggested angling the branch to the left to create gentle, flowing lines that extended from that side of the vase. With a final touch—a stem of sea lavender—Yoshiko-san’s arrangement was complete!


It was interesting how Yoshiko-san and Saori-san’s arrangements felt so distinct, despite using the same vase shape. Yoshiko-san’s artistically shaped branches transformed the vase’s impression, creating a strikingly different composition.
In Part 3, we come to the challenge of arranging flowers in large vases. This was the most challenging, yet the end results were a sight to behold. Please enjoy stunning floral displays presented in magnificent Japanese Kutani ware vases in the last part of our ikebana lesson blog.


Popular posts
Popular posts
Categories
Categories
Leave a comment
This site is protected by hCaptcha and the hCaptcha Privacy Policy and Terms of Service apply.